(first published on 2023.03.14, rewritten on 2026.07.08)
What I have now
Again, before going into details, this is my current setup.
- System drive: 256GB SSD (no redundancy)
- Array for miscellaneous data: software RAID1 (btrfs) on 2x3TB drives
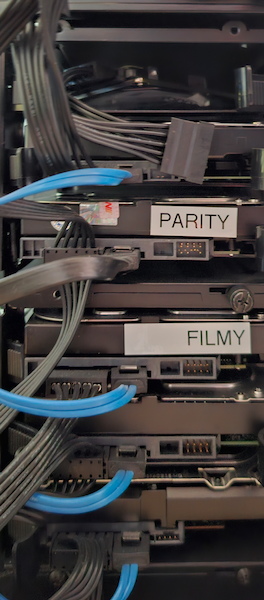
- Array for video files: SnapRAID on 4 HDDs, mixed sizes (1TB, 3x4TB)
- Data drives encrypted with LUKS, using method 2: providing the password later
Do you need RAID?
RAID stands for Redundant Array of (Inexpensive|Independent) Disks. Which means the data is stored on more than one disk. If one HDD fails, the array will continue to operate, your data will be still available. When you replace the failed drive, the array will rebuild.
RAID vs backup
RAID protects you from drive failure.
Backup protects you from drive failure, controller failure, accidentally deleting a file, ransomware encrypting all your drives, fire, theft, flood and pretty much any other reason of data loss.
If you’re going to choose between the two, choose backup. One good reason to have RAID in addition to backup is recovery time. Restoring terabytes of data from backup takes hours or days, RAID just continues to work. Which is why RAID is necessary for professional servers, to keep the business running, for home use it’s optional.
Which RAID is right?
Hardware vs software
If you read very old articles, they might argue that software RAID is slow. That is not the case anymore. Modern CPUs (as in: made in the last 15 years or so) are so fast you won’t notice any performance impact under normal conditions. Maybe during the array rebuild, but even then HDD speed will be the bottleneck.
Proper RAID controllers, e.g. MegaRAID or Dell PERC, offload everything from the CPU. I worked with them on real servers (in those unusual cases when you still use a physical server), but I’m not buying one for home. But if you happen to have one, you can consider using it.
Some home motherboards offer hardware RAID, but do it so poorly that it’s actually slower than software RAID. And I wouldn’t trust them with my data.
Hardware RAID gives an abstraction layer between your drives and your OS. You configure the array in BIOS setup tool or with an additional utility (e.g. megacli), the OS sees a single SCSI drive. It simplifies the view - either you work with physical drives or with filesystems, never mixing the two - but it also means you can’t use standard Linux tools to test and monitor the hard drives.
For most people, the choice is between:
- standard Linux software RAID (built into kernel, configured with mdadm)
- modern filesystems (ZFS, btrfs) that combine filesystem, RAID and volume management
- RAID-like solutions such as SnapRAID
There are, as usual, tradeoffs, more on that later.
RAID levels
RAID0 - striping
R in RAID stands for Redundant. RAID0 isn’t - it spreads the writes across all drives to increase performance. If you lose just one drive, you lose the whole array.
RAID1 - mirroring
The most basic form of RAID. The same information is written to each drive in a pair. If one fails, the other continues to function as if nothing happened. When both work, read throughput is increased compared to a single drive (data can be read from both simultaneously), write throughput is similar to a single drive, maybe just a bit slower (need to write on both and it’s mostly done simultaneously). Rebuilding the array after replacing the drive is a simple process of copying data. It’s a very safe level, but wastes half of the disk space.
The nice thing about Linux software RAID is you can take out one disk from a pair, install it in a machine without RAID support and just use it like a regular drive, all the files would be accessible.
RAID5 - parity
RAID5 stores parity information. Think of it like this. Disk 1: data set A, disk 2: data set B, disk 3: A+B. If drive 2 fails, it can be recreated by calculating “disk 3 - disk 1”. Except the data and parity are distributed between the disks, not written on a dedicated one (that was RAID 3 and 4, but nobody uses them anymore). And you can have more disks than 3. And the operation is not the sum. But you get the idea.
RAID5 can survive a failure of one drive in the array, if the other one fails before the rebuild is done, all your data is lost.
A huge advantage of RAID5 is the efficient use of storage. RAID1 always has a 50% capacity of disks. RAID5 on 3 drives - 66%, on 4 drives - 75%, etc. But there are also disadvantages. Performance is not as good as in RAID1. Read throughput is about the same as from a single disk, write throughput is worse and modifying small files is the biggest problem: the controller (or OS) needs to read the original sector, recalculate parity, write new data and new parity.
But the worst thing is what happens when a drive fails. Every read requires calculating the data from parity, hurting performance. Rebuilding requires recalculating the whole data contained on the failed disk from the information stored on all other disks. This means the process is long and requires a lot of operations on the remaining disks, increasing the chance that one of them fails as well.
For this reason, RAID5 is not recommended for professional use. For home uses, the opinions vary. I think that for small arrays (3-5 disks) the efficiency might be worth the risk. And you have a backup anyway, right? If you want to be extra safe, choose RAID1.
RAID6 - parity, but more of it
RAID6 is like RAID5, but it stores each parity block twice, on different drives. That means the array survives the failure of 2 hard drives.
Four disks are the minimum number of hard drives for RAID6 and would give you the same storage efficiency as RAID1, but with more complexity. It’s a level of choice for large arrays in professional settings (that usually also have hot spares and replace disks every few years even if they don’t show any problems, all to minimise the risk of a second drive failure before the rebuild is done). But if you’re managing one, you shouldn’t be getting your knowledge from some random guy’s blog.
RAID10 - 1+0
Combines mirroring and striping to give you both redundancy and performance. Sometimes used in professional settings, if throughput is more important than storage efficiency. Not much use at home.
RAID levels at a glance
| RAID | Min. disks | Usable capacity | Fault tolerance | Read perf | Write perf | Notes |
|---|---|---|---|---|---|---|
| RAID 0 | 2 | 100% (all disks) | None - any disk failure loses everything | High | High | Striping only, no redundancy |
| RAID 1 | 2 | 50% (1 disk’s worth) | 1 disk (per mirror pair) | High | Normal | Simple mirroring |
| RAID 5 | 3 | (n-1)/n | 1 disk | High | Reduced (parity calc) | Write hole risk on unclean shutdown |
| RAID 6 | 4 | (n-2)/n | 2 disks | High | Lower (double parity calc) | Safer than RAID5 for large/many disks |
| RAID 10 | 4 | 50% | 1 per mirror pair (up to half the disks, if spread right) | High | High | Mirror + stripe, best perf/redundancy balance, costly on capacity |
| RAID-Z1 (ZFS) | 3 | (n-1)/n | 1 disk | High | Reduced | Like RAID5, no write hole (COW) |
| RAID-Z2 (ZFS) | 4 | (n-2)/n | 2 disks | High | Lower | Like RAID6, no write hole |
Flexibility of Linux RAID
One good feature of mdadm - if you’re into DIY solutions and are not afraid of running strange configurations for some time - is the flexibility. If you plan to use RAID1 in future, but only have one drive now, you can create an array and declare one drive missing. It will show as degraded - obviously - but you can add the drive later and “rebuild”. It works the other way too - you can remove the drive if you temporarily need it for something else. Even better, put it into another computer with no RAID configured and it will still show all the data.
If you need more space and decide to change RAID1 to RAID5, that’s just two commands: one to add a 3rd drive and one to change RAID level. Similarly, you can convert RAID5 to RAID6.
Note that reshaping the array takes hours or days and your data might be at risk if the process is interrupted or if a drive fails mid-process (depending on the operation, many are safe). Always check mdadm documentation, consider testing on VMs first and make sure you have a tested backup.
But still, such operations are occasionally useful for home scenarios when you need to manage limited disk space. And no other tool offers that kind of flexibility.
Modern filesystems
Some modern filesystems - in particular, ZFS and btrfs - combine RAID, volume management, filesystem and other disk-related tools in one package. This has both advantages and disadvantages compared to the traditional way. The answer is not simple and will take a separate post. Before creating RAID with mdadm, read part 3 - you might want something else.
SnapRAID
A relatively new option for home NAS is SnapRAID. It’s an interesting software that combines the advantages of RAID5/6 with the advantages of no RAID at all. How is that possible? The name SnapRAID comes from Snapshot (as in: snapshot backups) and RAID, because it works like something in between the two:
- you have any number of data disks, they can have any filesystem such as ext4, XFS, JFS; could be different filesystems, different sizes,
- you have between 1 and 6 parity disks, they need to be as large as the largest data disk.
During normal operation, you only use the data disks, parity drives are not touched until you run the snapraid sync command (which is run either by cron, e.g. at night, or manually after you changed something on the data drives, depending on the use case). That works best for large files that are written once and never change - such as video files. Compared to proper RAID, there are some interesting advantages:
- you can add and remove disks whenever you like and combine sizes,
- the drives can already contain the data when added, they would still contain the data when removed,
- you can also use it to restore files that were accidentally deleted (if you’re fast),
- there’s very little disk space overhead (e.g. if you use 1 parity disk for 4 data disks, that’s only 20%),
- it protects against bitrot, while RAID doesn’t (see part 3 about bitrot),
- there’s no slowdown, no CPU usage and no extra I/O during normal operation, only during sync,
- you can set up your disks to power down and only the one that’s currently accessed will spin up (RAID5 or 6 would spin up all disks),
- if multiple disks break, you can still access the data on the other drives - unlike RAID5 and 6 when they would all be useless,
- while it is not recommended to use SnapRAID on USB drives, it is possible.
The downsides: your files are not protected from drive failure until you run “snapraid sync” and the technology is not as well tested as Linux RAID.
Testing the drives
Some of the hard drives I use are old, maybe even 10 years old. But even with the new drives it’s a good idea to test them. Especially if you can replace them under warranty. I had some old USB drives too and did the following to quickly check them:
- connected them to my laptop one by one,
- ran the short self-test:
smartctl -t short /dev/sdb - if there was already some data, checked the filesystem:
fsck -f /dev/sdb1 - short self-test takes about 2 minutes, after that time I would see the results plus all other SMART data:
smartctl -a /dev/sdb
Two drives were showing quite alarming results (failed self-test, high values in Reallocated_Sector_Ct). One of them had some old backups on it, it was also showing filesystem corruption and some files could not be read (nothing important though). I copied the data, wiped the drives and threw them away.
Should you immediately throw away the drive showing any errors in SMART data? It’s up to you, if you trust your RAID and backup, you might take your chances. Remember that a drive can fail without a SMART warning anyway. I’d say that one-digit numbers in Reallocated_Sector_Ct or Current_Pending_Sector are no cause for alarm. Some drives develop a few bad sectors early and then continue to work fine for years. But if you see the numbers rising or SMART overall health self-assessment goes bad, you better get a new drive soon.
In fact, two other drives were showing some “not great, not terrible” SMART attributes. I marked them as suspicious and made sure they are backed up. It’s handy to have a label writer when you’re dealing with 20 USB drives.
Then after connecting the drives to the target system it was time for a proper checkup. First, a long SMART self-test which takes several hours: smartctl -t long /dev/sdX
Another thing I did was a badblocks test overwriting the whole disk: badblocks -b 4096 -wsv /dev/sdX. To reiterate, it overwrites everything on the disk! Only use it with an empty drive. And it takes days on a large and slow drive. It was quite a pain, especially since some drives already had data, so I had to copy it around. But once it was done, I could be reasonably sure that every sector of the disk works properly. And if any errors were discovered and corrected by the drive firmware, they should show up in the SMART data.
Disk encryption
I wouldn’t use a laptop without an encrypted hard drive. Laptops often get lost or stolen. If you’re lucky, a thief will just reformat the laptop for sale. If you’re not, your data will be leaked, which means potential embarrassment or identity theft. Companies can even be fined for neglect. Both Windows (with BitLocker) and Linux (with LUKS) make it easy and almost transparent to encrypt a personal device. With Windows, you can even switch back and forth, with Linux, it’s better to choose during the installation whether you want encryption, changing your decision later means a manual process.
The balance isn’t the same for home servers. In many places, home burglaries are unlikely, even if they happen, a bulky PC is not a first choice for thieves. And servers usually run headless (without screen and keyboard). Which means the usual way of unlocking encrypted hard drives - typing a password during boot - is not possible.
Three ways to deal with it:
Method 1: no encryption
A valid choice for some. If your risk vs inconvenience assessment says so, I’m not judging.
Method 2: providing the password later
You set your system NOT to mount the encrypted filesystems on boot, and NOT start any daemons that depend on them. Instead, you create a script that will prompt for a password, unlock the devices, mount the filesystems and start the services. After the server boots, log in with SSH and run the script.
Upsides: easy to implement, no complex setups with many potential failure points, decent security.
Downsides: still requires manual intervention, system drive can’t be encrypted this way.
Overall, it can be a good choice for a home server that’s rarely booted. Not encrypting the system drive means some information is at risk (configuration in /etc, logs in /var, list of installed software) but for most home users it’s a reasonable tradeoff.
Method 3: passwordless LUKS
Password is the most common type of LUKS key, but there are other possibilities.
- LUKS key on a thumbdrive. You can use a file as the LUKS key. Store it on a thumb drive, make sure it’s present during boot, then remove it and keep it somewhere safe, away from the server. Least secure of all options here.
- systemd-cryptenroll with YubiKey or smartcard. Similar to the previous version, but slightly more secure: a thumbdrive can be copied, those devices can’t. Requires additional hardware that most people don’t have and a more complex setup. Useless if you leave your device in or next to the server.
- LUKS key in initramfs + Secure Boot. LUKS key is present in the initial ramdisk, so during normal boot, the disk is automatically unlocked. If you enable Secure Boot, password-protect the bootloader, UEFI setup and prevent selecting an alternative boot device, you’ll also protect the system during not-so-normal boot. Allows unattended boot and encryption of the system disk (but not /boot), but has one weak point: an attacker can move the hard drives to another machine, running their own OS, thereby bypassing your passwords. They can then extract the key from initramfs (which needs to be unencrypted in that setup), unlock and mount the drives. Probably above the pay grade of a common thief, but not beyond the skills of an experienced Linux user, not to mention a security professional.
- LUKS key in the TPM. TPM will only release the key if certain conditions are met. You can also configure it to always release the key, which works similar to the previous point, but addresses the weakness: if you move the drives to another machine, the TPM won’t contain the key anymore. Downsides: it’s the most complex option.
- Authorization server on the network. You’ll be surprised how much you can pack into initramfs to manage the way the system boots. One way is to contact Tang server to authorize unlocking the disk. If the server is moved away from the LAN, it won’t reach it. Tang server (and related Clevis client) are free and open source, in theory you could run it at home, but I’ve never heard of anyone doing it.
Are these methods practical? First two rely on removing your key after the system boots, leave it with the servers and you completely defeated the encryption. The others are much more complex. There’s a real risk of making your system unbootable due to configuration error or a failed update - you should have an additional LUKS key (e.g. a complex password you keep in your password manager) for recovery. There’s also a risk of leaving a way in if you miss one step (and the 3rd method already leaves a huge known vulnerability).
I don’t recommend passwordless LUKS unless you’re a seasoned sysadmin. Actually, I am a seasoned sysadmin and decided it’s not worth it for home use.